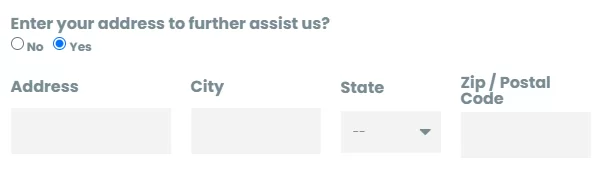
If you ever wanted to create conditional form fields with code using Elementor Pro, this tutorial will guide you on how to do that. We will be using an example where users will be asked if they would like to enter their address details. It will look like this once we’re done:
Building Your Form
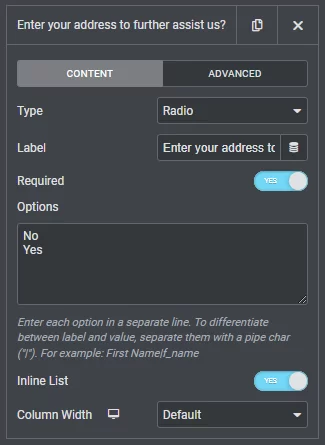
The first step is to make sure you have your form fields created. In this example, our conditional form field is going to be seeing if users want to enter their address. Within our form, let’s create a radio field with the label, “Enter your address to further assist us?“. Make it required. It should have two options, “No” and “Yes“.
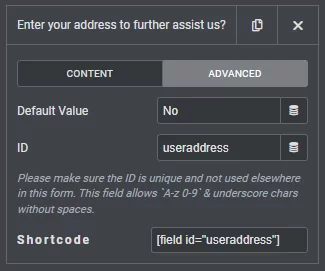
Next, in the “Advanced” tab, set the default value to “No“. The ID should be set to, “useraddress“.
Creating Your Conditional Option Fields
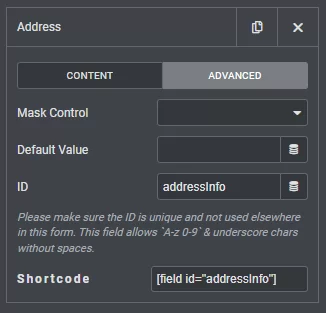
After we have created our main conditional form field, we want to create the fields that will show up based on whether the user selects No or Yes. In this example, we will be adding, Address, City, State, and Zip / Postal Code.
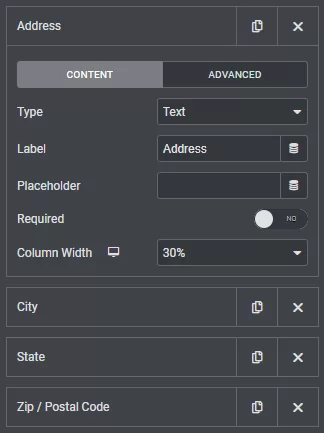
Under the “Advanced Tab”, have the ID be, addressInfo. For the other fields, we’ll be using the following for their IDs:
- City – addressInfoCity
- State – addressInfoState
- Zip / Postal Code – addressInfoZip
Adding the Code
You will want to create an HTML widget within Elementor Pro. Copy and paste the following into the HTML widget:
<script type="text/javascript">

jQuery(document).ready(function(){
// We're wrapping the code with 'elementor/popup/show' because we want this form in a popup
jQuery(document).on('elementor/popup/show', () => {

// Create the variable for all the elements
var radioSelectNo = document.getElementById("form-field-useraddress-0");
var radioSelectYes = document.getElementById("form-field-useraddress-1");
var addressField = document.querySelector('.elementor-field-group-addressInfo');
var cityField = document.querySelector(".elementor-field-group-addressInfoCity");
var stateField = document.querySelector(".elementor-field-group-addressInfoState");
var zipField = document.querySelector(".elementor-field-group-addressInfoZip");

// We want to set our address fields to not display by default
document.querySelector('.elementor-field-group-addressInfo').style.display = "none";
document.querySelector('.elementor-field-group-addressInfoCity').style.display = "none";
document.querySelector('.elementor-field-group-addressInfoState').style.display = "none";
document.querySelector('.elementor-field-group-addressInfoZip').style.display = "none";

// When a user selects "Yes", the style on the fields displays to "flex"
radioSelectYes.onchange = function () {

addressField.style.display = "flex";
cityField.style.display = "flex";
stateField.style.display = "flex";
zipField.style.display = "flex";
}

// When a user selects, "No", the style goes back to the default we set it at, "none"
radioSelectNo.onchange = function () {

addressField.style.display = "none";
cityField.style.display = "none";
stateField.style.display = "none";
zipField.style.display = "none";
}
});

});

</script>
Note that in the code above, all of the JavaScript is wrapped with “jQuery(document).on(‘elementor/popup/show’, () => { ACTUAL CODE HERE });”. You can leave this here if you want to have your form in an Elementor Popup. If not, you can remove it. Be sure to remove the bottom portion too of, });.
Now, on the front end of your site, if you go to your form, by default the address fields should be hidden by default. Once you select, “Yes”, they will show.
You can replace portions of the code to fit your conditional fields. Just be sure to match everything with what you have given the ID for each form field. Elementor will add pre-text to the form field class called, .elementor-field-group-.